How To Tone Your Photos In Photoshop
Here is a quick technique you can use to tweak the colors of your photos. This is particularly helpful if you've underexposed an image or it's a cloudy day.
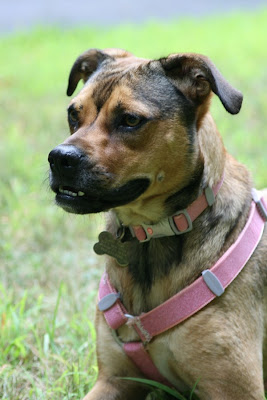
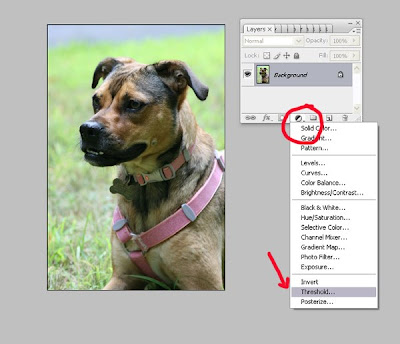
This is a test shot before a photo shoot of the lovely Mimi. It was cloudy outside so the colors are not as sharp as they could be. Her mouth and nose especially are very dark.
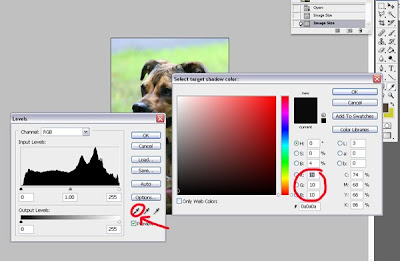
First I'm going to set the black and white values of my Levels. (In Photoshop, go to “Image” ‐‐> “Adjustments” ‐‐> “Levels”.) Photoshop will preload levels for you. You can change the values by double clicking on the black or white eyedropper. Let's start with black. I set my RGB values to "10" for each one. Then click OK.
Now double click on the white eyedropper.
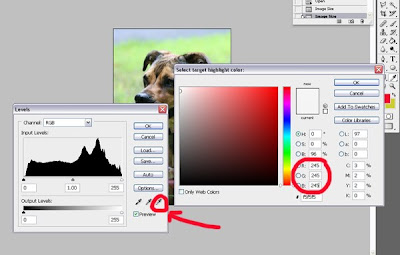
I set my RGB values to "245" for each one. Then click OK. You'll be left with the levels window. Click OK to close. Now there is one more step to take. Go to Window‐‐> Layers.
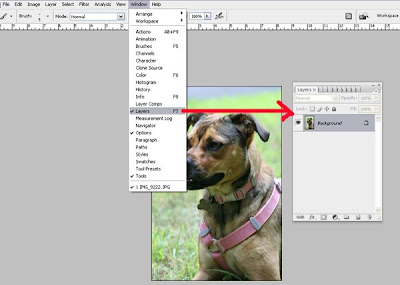
A new box will show on your screen. Right click on the ying‐yang image at the bottom of this box. Select "Threshold."
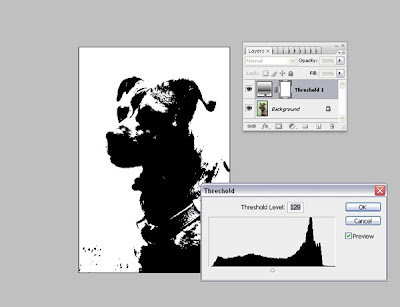
Your image will turn to black and white.
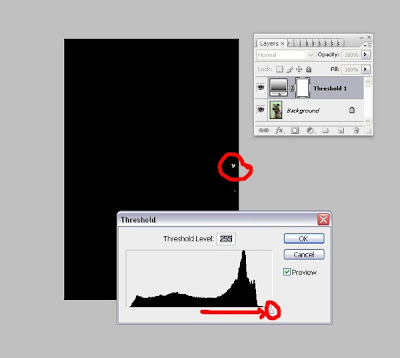
Now when you slide the little arrow to the right, your image will turn to black. In my case, a little bit of white remains. This is the brightest part of my photograph. (If no white appears for your image, slowly move the arrow back to the left until the first white shows in your photo.)
When you move your mouse to go over your photo, a little eye dropper will appear. Hold down the Shift key and click on that white space. This will leave a cross hair on your image as a marker for later, as seen in the next example.
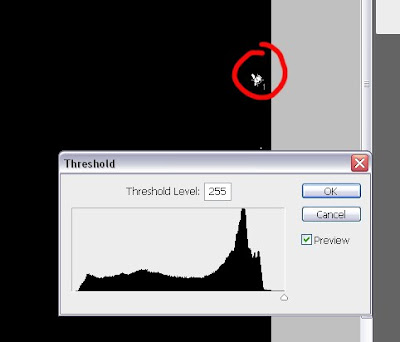
Now you'll do the same to find the darkest part of your photograph. Slide the little arrow to the right. Your photo will turn white. Now slowly move your arrow back to the left until something black appears.
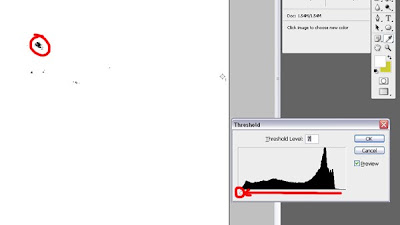
Move your mouse to that part of the photo and hold down the Shift Key and click. Now you will have another cross hatch. When you are finished, click OK.
Now that we're done using the "Threshold" feature, you can go into your Layers box and delete it.
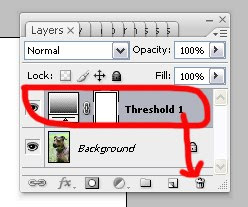
Click and hold that layer and drag it into the trash can icon.
Now you'll have your photo back. Go back to "Levels" by going to "Image" ‐‐> "Adjustments" ‐‐> "Levels" and the Levels box will come up.
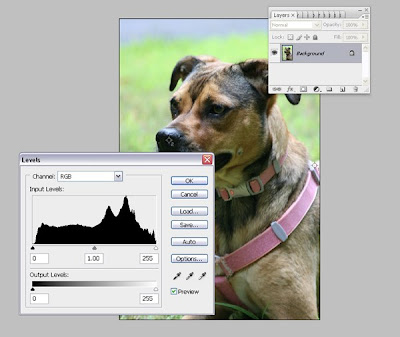
Now click on the black eye dropper and find your cross hair (in this case, it will show as cross hair 2 on my photo).
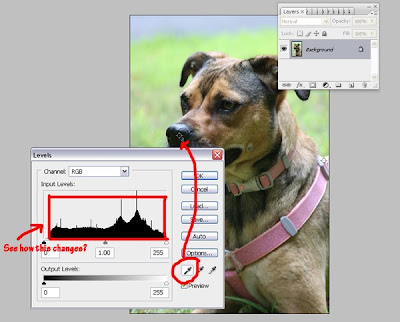
Click on that space. Your image should change in tonal values (also notice how the Levels graph changes after you click).
Now you just need to tone the highlight.
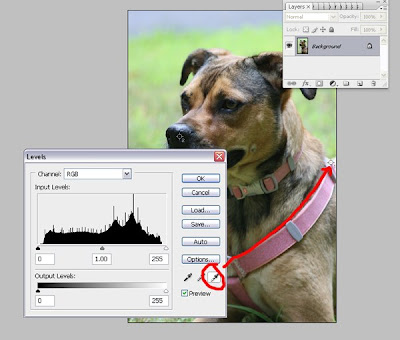
Click on the white eyedropper and then click on your first cross hair.
When finished, click OK.
The cross hairs will still show on your image but will not show when you go to print your photo.
If you still want to play with your image, you can do other things in Photoshop, such as playing with Curves ("Image" ‐‐> "Adjustments" ‐‐> "Curves").
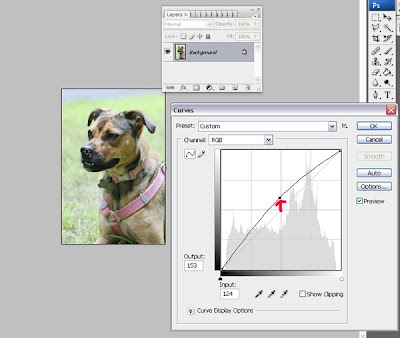
In here you can also play with how dark or bright the photo is by moving the graph up and down.
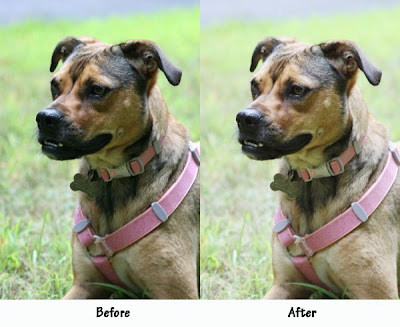
Thank you to Allover Art for inviting me to do this feature! I hope you find the above tutorial helpful! :)
Please be sure to check out Jen's work in her Etsy shop, McGuinness Photography! You can also find Jen in her other Etsy shop Fairy Crystals, in her Artfire Shop, and on her blog. Are you on Twitter? Check Jen out at username JMCPhoto.
**Interested in participating in future Workshop Wednesdays? Please convo me on Etsy or leave me a comment on this post.

This is a test shot before a photo shoot of the lovely Mimi. It was cloudy outside so the colors are not as sharp as they could be. Her mouth and nose especially are very dark.
First I'm going to set the black and white values of my Levels. (In Photoshop, go to “Image” ‐‐> “Adjustments” ‐‐> “Levels”.) Photoshop will preload levels for you. You can change the values by double clicking on the black or white eyedropper. Let's start with black. I set my RGB values to "10" for each one. Then click OK.

Now double click on the white eyedropper.

I set my RGB values to "245" for each one. Then click OK. You'll be left with the levels window. Click OK to close. Now there is one more step to take. Go to Window‐‐> Layers.

A new box will show on your screen. Right click on the ying‐yang image at the bottom of this box. Select "Threshold."


Your image will turn to black and white.

Now when you slide the little arrow to the right, your image will turn to black. In my case, a little bit of white remains. This is the brightest part of my photograph. (If no white appears for your image, slowly move the arrow back to the left until the first white shows in your photo.)
When you move your mouse to go over your photo, a little eye dropper will appear. Hold down the Shift key and click on that white space. This will leave a cross hair on your image as a marker for later, as seen in the next example.

Now you'll do the same to find the darkest part of your photograph. Slide the little arrow to the right. Your photo will turn white. Now slowly move your arrow back to the left until something black appears.

Move your mouse to that part of the photo and hold down the Shift Key and click. Now you will have another cross hatch. When you are finished, click OK.
Now that we're done using the "Threshold" feature, you can go into your Layers box and delete it.

Click and hold that layer and drag it into the trash can icon.
Now you'll have your photo back. Go back to "Levels" by going to "Image" ‐‐> "Adjustments" ‐‐> "Levels" and the Levels box will come up.

Now click on the black eye dropper and find your cross hair (in this case, it will show as cross hair 2 on my photo).

Click on that space. Your image should change in tonal values (also notice how the Levels graph changes after you click).
Now you just need to tone the highlight.

Click on the white eyedropper and then click on your first cross hair.
When finished, click OK.
The cross hairs will still show on your image but will not show when you go to print your photo.
If you still want to play with your image, you can do other things in Photoshop, such as playing with Curves ("Image" ‐‐> "Adjustments" ‐‐> "Curves").

In here you can also play with how dark or bright the photo is by moving the graph up and down.

Thank you to Allover Art for inviting me to do this feature! I hope you find the above tutorial helpful! :)
Please be sure to check out Jen's work in her Etsy shop, McGuinness Photography! You can also find Jen in her other Etsy shop Fairy Crystals, in her Artfire Shop, and on her blog. Are you on Twitter? Check Jen out at username JMCPhoto.
**Interested in participating in future Workshop Wednesdays? Please convo me on Etsy or leave me a comment on this post.

6 comments:
Very interesting...it's great to be able to do these adjustments....and to share them with others...
What a great thing to share..I just wish I had Photoshop..sometimes, I get a bit overwhelmed reading how to do things..You really explained very nicely..
Thanks so much for walking through that! I am very interested in Photoshop. I'll be playing with it today!
Thank you for letting me participate!! :)
Oh this is a nice tutorial! Thank you for sharing!
Great tutorial - this makes things much more clear to me! Thanks to Jen and Ruth.
Post a Comment