Showing posts with label Workshop Wednesday. Show all posts

Wednesday, June 17, 2009

Workshop Wednesday

Today marks another installment of a my weekly blog series titled Workshop Wednesday. Each Wednesday will feature either a tutorial by yours truly or another talented artist or artisan, or a snapshot of an artist's creative process. This week's Workshop Wednesday features Zemphira, who is graciously showing us how to create her fantastic reversible headbands.

How To Create A Reversible Headband, Zemphira-Style


You Will Need:

2 pieces of fabric that measure 19 inches by 3 inches
5 inches of elastic
template and tracing utensil, safety pin
iron, sewing machine, thread, scissors, & and chopstick


Step 1-
Choose your fabric. I tend to use two fabrics that somewhat coordinate. Cut a 19x 3 inch rectangle from each fabric.

Step 2 - Put the two fabrics right sides together, and then fold them in half. Place the end of the template on the fold and then trace. Cut out the pieces on the line.


Step 3- Sew the two pieces of fabric together leaving the ENDS open as well as a 2 inch hole along one side. (sew 1/4 inch away from the edge)


Step 4 - Attach a safety pin to one end of the elastic and thread it through one end of the headband. Do not pull it all the way through, stop with a little bit of elastic hanging out of the end. Then sew down that end of the elastic - I backstitch over the elastic a few times. Then pull the elastic out the other end and sew it down. (right now the headband will be scrunched up and inside out)


Step 5- Turn the headband right-side out through the 2-inch hold you left on one of the long sides. Use a chopstick to push out the corners and along the seams. Iron the headband flat.


Step 6- Top-stitch a little less than a 1/4 inch all the way around the headband - make sure you pay extra attention when you are sewing the hole to be sure you close it up.


Step 7 - Wear your headband, give your headband away, and then create another!


Be sure to check out more of Zemphira's work in her Etsy shop! If you're interested in being a part of future Workshop Wednesdays, please feel free to convo me in my Etsy shop or comment on this post. Have a great day!

Wednesday, June 3, 2009

Workshop Wednesday With House Of Mouse

Each week I run a blog series titled Workshop Wednesday. Each Wednesday features either a tutorial by yours truly or another talented artist or artisan, or a snapshot of an artist's creative process. I've expanded the Workshop Wednesday feature to include photos of artists' workspaces or studios. It's been difficult to regularly find tutorials and snapshots of an artist's creative process, so I'm hoping that by expanding the Workshop Wednesday I'll be able to feature more artists and artisans. Plus, it's always interesting to get a peek inside another artist's creative space. :)

Today's studio space post features the House of Mouse. Here's what she has to say about her recently refurbished creative space.

My studio is finally finished! I can't believe how much I have missed having my own creative space to work in. It is 10 times better than it was before. I have added loads of extra storage space - who would have thought the materials for making tiny little mice would take up so much room?! The walls are plastered - no more bumpy peeling wallpaper, yay! I have a nice new wooden floor. Now I can get on with crafting more mice than ever before. I hope you enjoy this tour around my shiny new studio.

Lots of new shelves and cabinets. Can you spot ArtMind's babushka dolls on my shelves? I think I need to buy some more soon. I love wind chimes and dreamcatchers hanging from my window. I wish I had more room for plants too.


My little photo corner with my light boxes. Soon I am going to write a tutorial on how to make a light box and use photo editing software to get your photos looking bright and beautiful.

My ribbon board is full! I think I am going to need to make another one soon. I have a little tool box full of beads and flowers, it is hanging on the wall under my pin board. I put my writing board on the wall and forgot to wipe off the old writing. It looks very odd with the writing on sideways! My new favourite addition to my work table is a pair of magnetic strips of metal on the wall. I can stick all my scissors too it and keep them out of my way.

Be sure to check out the House of Mouse on Etsy and on her blog! She creates fabulous "little mice with big hearts".


If you're interested in being a part of Workshop Wednesdays, please feel free to convo me in my Etsy shop or comment on this post. I'm looking forward to seeing what everyone comes up with! Have a wonderful day.

Wednesday, May 27, 2009

Workshop Wednesday With Live*Lovely

Today marks another installment of my weekly blog series titled Workshop Wednesday. Each Wednesday will feature either a tutorial by yours truly or another talented artist or artisan, a snapshot of an artist's creative process, or a peek into their creative space. This week's Workshop Wednesday features a tutorial by Live*Lovely Dress Shop.

How to make a cute scarf for your hair

This is a great project because not only is it a great accessory to wear, it also helps you use up some of those awkward scraps you sometimes wind up with after sewing.

You’ll need:

A pretty scrap of fabric big enough to cut into a 32” by 6” rectangle
A tape measure
Scissors
A sewing machine and thread
An iron and ironing board

Step 1.
Cut your fabric into a rectangle measuring 6” by 32”. (This fits the average size noggin, but just to be sure you could use your tape measure to measure the circumference of your head where you would wear the scarf and then add a total of 8 ½ inches to that—4 for each side to tie, plus seam allowance.)


Step 2.
Fold the fabric in half right side to right side across the short end so it’s a long skinny rectangle, with the back of the fabric out.


Step 3.
Sew the edges together along one short side and the long side opposite the fold. Leave a small seam allowance (¼”) so there isn’t a ton of bunching later. STOP before you totally close it. [insert 04] You need to leave one side open so you can turn it inside out. Definitely have zoned out and sewed the whole thing before. As my grandmother used to say, “As you sew, so shall you rip.” : )


Step 4.
Turn it inside out so you can see the pretty side of the fabric.


Step 5.
Now you will have a frumpy and frayed looking hairscarf.


You need to iron it! Start ironing at the closed end.


When you get to the other end, turn the frayed edges under about ¼”. Then iron them that way so they will stay while you sew it closed.

Step 6.
Sew the turned under edges together.


Tada! A new hairscarf for you. I make at least one of these for just about every dress I sew.


I love that when you just tie it in a regular knot I winds up looking like a bow. I haven’t found the right outfit to go with it to wear the bow in front yet, but I think it could be really cute!


Be sure to check out some of the work in Live*Lovely's Etsy shop! Here are a few of her creations.


If you're interested in being a part of future Workshop Wednesdays, please feel free to convo me in my Etsy shop or comment on this post. Have a great day!

Wednesday, May 20, 2009

Workshop Wednesday

Today marks another installment of my weekly blog series titled Workshop Wednesday. Each Wednesday will feature either a tutorial by yours truly or another talented artist or artisan, or a snapshot of an artist's creative process. This week's Workshop Wednesday features Karen of TuscaloosaRoad. She has put together a great tutorial on how to create an eco-friendly cuff. I posted this tutorial in March but it's one of my favorites and I wanted to share it again.

Eco-Friendly Sweater Cuff

What You’ll need:

Sweater fabric - Your local Goodwill or other thrift stores will carry sweaters of all kinds in fairly good condition. Choose sweaters that have a tight weave - cashmere works best because it’s natural and VERY soft. You’d be surprised what you’ll find while at the thrift shop. They carry some very nice items, and you could easily spend hours there. You’ll have to remind yourself to keep on track and repeat to yourself, “I’m shopping for sweaters, I’m shopping for sweaters!”

Yarn - This can also be found at your local thrift shop.

Embellishments - anything will do…a favorite button or pin, or a stash of beads works nicely.

Step 1:

Gather your sweater fabric together and choose colors that you feel will go together nicely. Here I have 4 sweaters in a creamy cashmere, a taupe cashmere, a camel colored cotton cable knit (say that three times fast!) blend, and apple green mohair blend. I ended up using all sweaters except the taupe cashmere on this project.


Step 2:

Now your ready to design the length, style and circumference of your cuff!

Cut several strips of sweater fabric of the same length and lay them out, making sure there are enough strips to cover the circumference of your forearm.

I find that if you use the ribbed areas of the sweater, it holds nicely when you sew the pieces together.

Choose the yarn you’ll be using. Here I’m using bright mustard, rust and olive colors in a 100% wool blend. Notice that my yarn contrasts with the natural colors of the cuff material. You can use whatever yarn color suits your fancy.


Step 3:

Using a very simple overstitch, stitch your cuff pieces together lengthwise. This step takes a little while. I’d say this cuff took me 2.5 hours to stitch. Grab a cup of tea, put on your favorite TV show, and stitch away.

Make sure to overstitch the top and bottom of the cuff too, to deter any fraying.


Once you finish sewing, you’re almost done! Notice how pretty and sinewy the stitches contrast against the fabric on your cuff. It will look very organic and if some of the ends fray a little bit, that’s o.k! It will add to the character of your cuff.


Step 4:

This is my favorite step. Gather together some trinkets for embellishing your cuff. I found these at garage sales and on Etsy. I chose the enameled calico cat pin for this cuff. I’ve decided to name him Cecil. I love the mustardy yellow color on Cecil the cat’s fur. I used him as my cuff’s center-of-attention.


Step 5:

Your done! Now you have an eco-friendly cuff that will look beautiful with a sweater and a pair of jeans. And it will keep your wrist warm too!


Be sure to check out Karen's work in her Etsy shop! If you're interested in being a part of future Workshop Wednesdays, please feel free to convo me in my Etsy shop or comment on this post. Have a great day!

Wednesday, May 13, 2009

Workshop Wednesday

Each week I run a blog series titled Workshop Wednesday. Each Wednesday features either a tutorial by yours truly or another talented artist or artisan, or a snapshot of an artist's creative process. I've expanded the Workshop Wednesday feature to include photos of artists' workspaces or studios. It's been difficult to regularly find tutorials and snapshots of an artist's creative process, so I'm hoping that by expanding the Workshop Wednesday I'll be able to feature more artists and artisans. Plus, it's always interesting to get a peek inside another artist's creative space. :)

Today's studio feature is Gretchen of WhiteHopeDesigns. Gretchen creates jewelry, aprons, bags, and softies. Here's what she had to say about herself and her work.


I am mommy to a 2-yr-old named Layla and wife to a soldier with the 82nd Airborne Division. We are originally from Tampa, Fl but "Home is where the Army sends you" so we live here in NC. Honestly, I'd rather be at the beach. I am lucky enough to be able to stay home with my daughter and work full time on my crafts. This is so much better than punching a clock! My crafts are my creative outlet, my break from a "terrible two" and my distraction during long deployments.


Gretchen was gracious enough to open the doors to her studio and give us a peek at her creative space. When asked about where she creates all her fabulous work, this is what she had to say.

What I do in my Workshop/Studio: I do pretty much anything I can get my hands into; sew bags and aprons, make jewelry, scrapbook, paint, embroider, color with my 2-yr-old Layla, and (unfortunately) pay my bills. Right now, I'm working on a new bag design that came to me in my sleep. I'm also teaching my husband how to make jewelry. He really likes it and I think it's a good change from guns and ammo with the Army all day! My studio is the one place in the house that is all mine! I don't have to share if I don't want to. I can make a huge mess and just shut the door. I can be quiet and be myself!


Want to find out more about Gretchen and WhiteHopeDesigns? Check out these links!

Shop: www.whitehopedesigns.etsy.com
Blog: www.armyapronstrings.blogspot.com
Twitter: www.twitter.com/whitehopedesign


If you're interested in being a part of Workshop Wednesdays, please feel free to convo me in my Etsy shop or comment on this post. I'm looking forward to seeing what everyone comes up with! Have a wonderful day.

Wednesday, May 6, 2009

Workshop Wednesday

Each week I run a blog series titled Workshop Wednesday. Each Wednesday features either a tutorial by yours truly or another talented artist or artisan, or a snapshot of an artist's creative process. I've expanded the Workshop Wednesday feature to include photos of artists' workspaces or studios. It's been difficult to regularly find tutorials and snapshots of an artist's creative process, so I'm hoping that by expanding the Workshop Wednesday I'll be able to feature more artists and artisans. Plus, it's always interesting to get a peek inside another artist's creative space. :)

My first studio space post feature's Beth of UberArt. Here's what she has to say about her space.

I always enjoy seeing pictures and reading about other people's creative spaces. I'm glad to have a room to call my own...it wasn't always like that. In our first house, I shared a tiny 8 x 9 room with the computer desk. If my husband was working at the desk and I was at my work table, we'd bump the backs of our chairs into each other! I utilized every square inch of my space, though.


I spend a lot of time sitting in this chair working on the computer! (Not the little blue chair, the big one! The little one is for my creative assistant.)


This is where the journals and my other works of art are born! I love my "new" floor lamp inherited from my grandmother. It's true vintage! And behold, I can see what I'm doing now!!


Here is the studio watchdog, hard at work! Don't let him fool you, no one can enter or leave the room without his knowledge. He sleeps with one eye open. Sometimes I try to sneak by him to get a snack from the kitchen. Just when I think I've been successful, he usually appears quite suddenly behind me in the pantry! "Whatcha got there, mum? Any to share?"


My sewing table (which is not often used!) and my "resource center". My husband built the bookcase for me. I got sick of the cheap store bought ones that warp under the heavy weight of my art books. I had to keep flipping the shelves over to bend them in the opposite direction! This bookcase is solid wood, and guess what? No warped shelves! Yeah!


My bulletin board, cluttered with inspiration and little gifts from friends!


If you're interested in being a part of Workshop Wednesdays, please feel free to convo me in my Etsy shop or comment on this post. I'm looking forward to seeing what everyone comes up with! Have a wonderful day.

Wednesday, April 29, 2009

Call For Workshop Wednesday Participants

Each week I run a blog series titled Workshop Wednesday. Each Wednesday features either a tutorial by yours truly or another talented artist or artisan, or a snapshot of an artist's creative process. Here are examples of past Workshop Wednesday posts:

1/14 - How To Create A Resin Finish On A Wood Tile, by Allover Art
1/21 - Handmade Dog Collars With GoneDoggie
1/28 - Handcrafted Wooden Toys With McCoyToys
2/4 - Pet Portrait Process With Allover Art
2/11 - Photoshop Tutorial With McGuinness Photography
2/18 - How To Make A Canvas Collage, by Tangente
2/25 - How To Create A Reversible Headband, by Zemphira
3/4 - Crocheted Flower Earrings With Jennifer White Designs
3/11 - How To Create An Eco-Friendly Cuff, by TuscaloosaRoad

I'd like to expand the Workshop Wednesday feature to include photos of artists' workspaces or studios. It's been difficult to regularly find tutorials and snapshots of an artist's creative process, so I'm hoping that by expanding the Workshop Wednesday I'll be able to feature more artists and artisans. Plus, it's always interesting to get a peek inside another artist's creative space. :)

If you're interested in being a part of Workshop Wednesdays, please feel free to convo me in my Etsy shop or comment on this post. I'm looking forward to seeing what everyone comes up with! Have a wonderful day.

Wednesday, April 22, 2009

Workshop Wednesday

Today marks another installment of a new weekly blog series titled Workshop Wednesday. Each Wednesday will feature either a tutorial by yours truly or another talented artist or artisan, or a snapshot of an artist's creative process. This week's Workshop Wednesday features Jen of McGuinness Photography, and I'm super-excited about her Photoshop tutorial "How To Tone Your Photos In Photoshop."

How To Tone Your Photos In Photoshop

Here is a quick technique you can use to tweak the colors of your photos. This is particularly helpful if you've underexposed an image or it's a cloudy day.


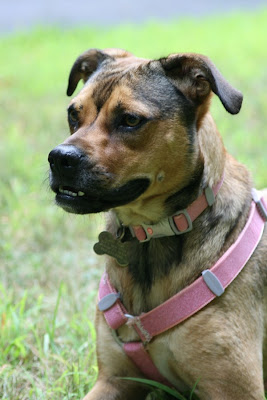
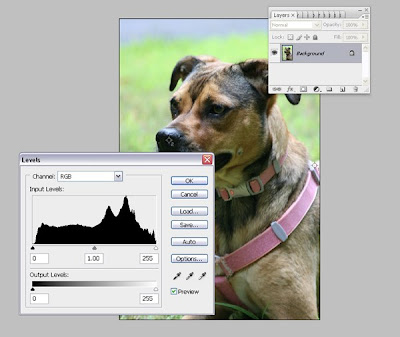
This is a test shot before a photo shoot of the lovely Mimi. It was cloudy outside so the colors are not as sharp as they could be. Her mouth and nose especially are very dark.

First I'm going to set the black and white values of my Levels. (In Photoshop, go to “Image” ‐‐> “Adjustments” ‐‐> “Levels”.) Photoshop will preload levels for you. You can change the values by double clicking on the black or white eyedropper. Let's start with black. I set my RGB values to "10" for each one. Then click OK.


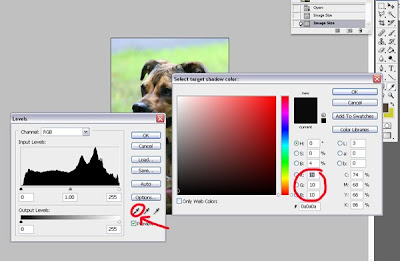
Now double click on the white eyedropper.


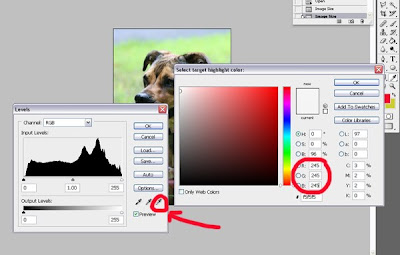
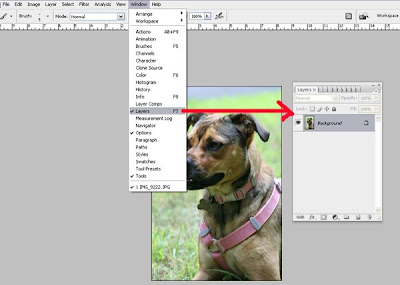
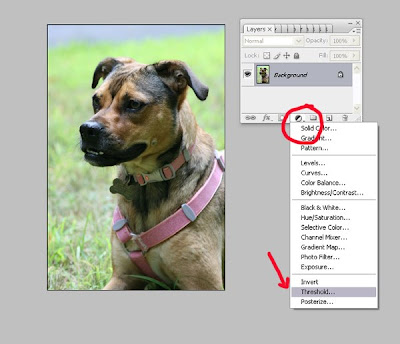
I set my RGB values to "245" for each one. Then click OK. You'll be left with the levels window. Click OK to close. Now there is one more step to take. Go to Window‐‐> Layers.


A new box will show on your screen. Right click on the ying‐yang image at the bottom of this box. Select "Threshold."


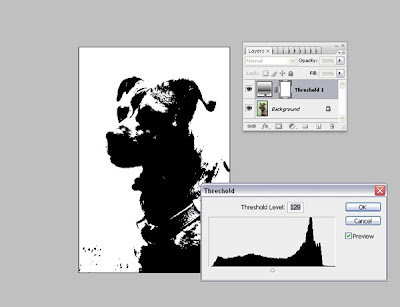
Your image will turn to black and white.


Now when you slide the little arrow to the right, your image will turn to black. In my case, a little bit of white remains. This is the brightest part of my photograph. (If no white appears for your image, slowly move the arrow back to the left until the first white shows in your photo.)

When you move your mouse to go over your photo, a little eye dropper will appear. Hold down the Shift key and click on that white space. This will leave a cross hair on your image as a marker for later, as seen in the next example.


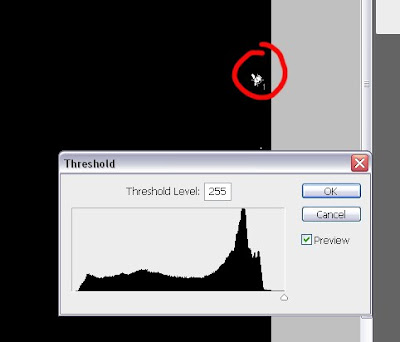
Now you'll do the same to find the darkest part of your photograph. Slide the little arrow to the right. Your photo will turn white. Now slowly move your arrow back to the left until something black appears.


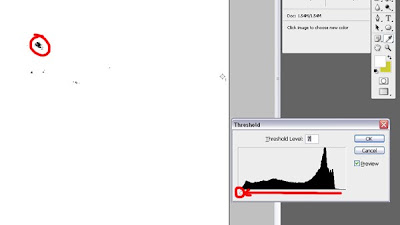
Move your mouse to that part of the photo and hold down the Shift Key and click. Now you will have another cross hatch. When you are finished, click OK.

Now that we're done using the "Threshold" feature, you can go into your Layers box and delete it.


Click and hold that layer and drag it into the trash can icon.

Now you'll have your photo back. Go back to "Levels" by going to "Image" ‐‐> "Adjustments" ‐‐> "Levels" and the Levels box will come up.


Now click on the black eye dropper and find your cross hair (in this case, it will show as cross hair 2 on my photo).


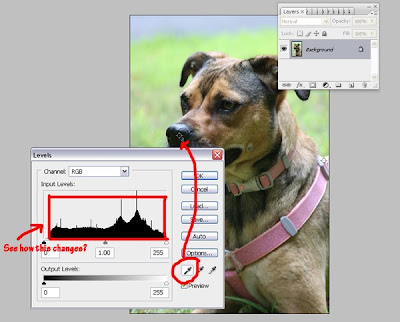
Click on that space. Your image should change in tonal values (also notice how the Levels graph changes after you click).

Now you just need to tone the highlight.


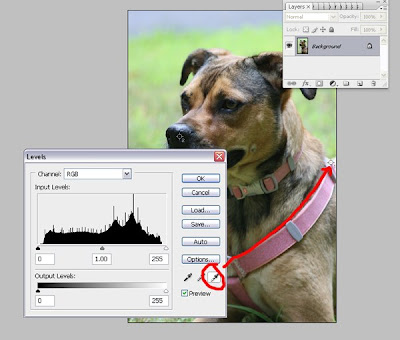
Click on the white eyedropper and then click on your first cross hair.

When finished, click OK.

The cross hairs will still show on your image but will not show when you go to print your photo.

If you still want to play with your image, you can do other things in Photoshop, such as playing with Curves ("Image" ‐‐> "Adjustments" ‐‐> "Curves").


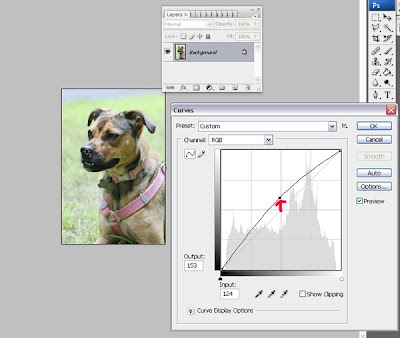
In here you can also play with how dark or bright the photo is by moving the graph up and down.


Thank you to Allover Art for inviting me to do this feature! I hope you find the above tutorial helpful! :)

Please be sure to check out Jen's work in her Etsy shop, McGuinness Photography! You can also find Jen in her other Etsy shop Fairy Crystals, in her Artfire Shop, and on her blog. Are you on Twitter? Check Jen out at username JMCPhoto. If you're interested in being featured in future Workshop Wednesday segments, please feel free to convo me in my Etsy shop or email me. Have a wonderful day!